


Get going fast
Debtinator is big and complex and powerful. It's what makes it such a great tool for you. The banks have lots of sophisticated software working for them, and we're trying to settle the score by giving you a powerful tool to work with as well.
But we also know that since it's big and complex and powerful that getting started can be a bit tough. So here's a crash course to get you going with the most simple setup possible. You can then go back and modify what you've typed in to better reflect reality.
Don't want to read much? Then watch the quickstart tutorial online at http://www.bassetsoftware.com/debtinator/tutorials.html
Step 1. Bank Accounts.
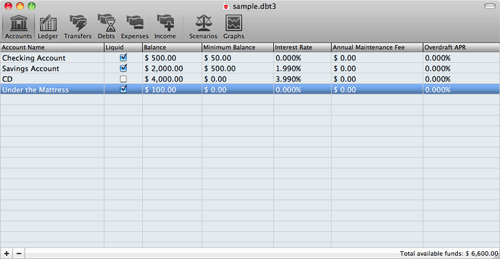
- Click on the Accounts Pane (far left of the toolbar)
- You start off with a single bank account - 'Default Bank Account'. Double click on the name to call it something more useful. "Checking" or "Savings" or whatever.
- Next, fill in your current bank account balance. Double click on the balance and type in the current balance.
- If you've got more bank accounts you want to work with right now, add those in too. Click the "+" in the lower left to add a new account, then name it and fill in the balance.
- For more information, see Working with Accounts
- If you set up multiple bank accounts and want to automatically transfer money between them, then go see Working with Transfers
- Don't worry about this right now, but when you've gotten things going to your liking you'll probably want to add some Budgets. At that point go see Working with Budgets
Step 2. Add your Income.
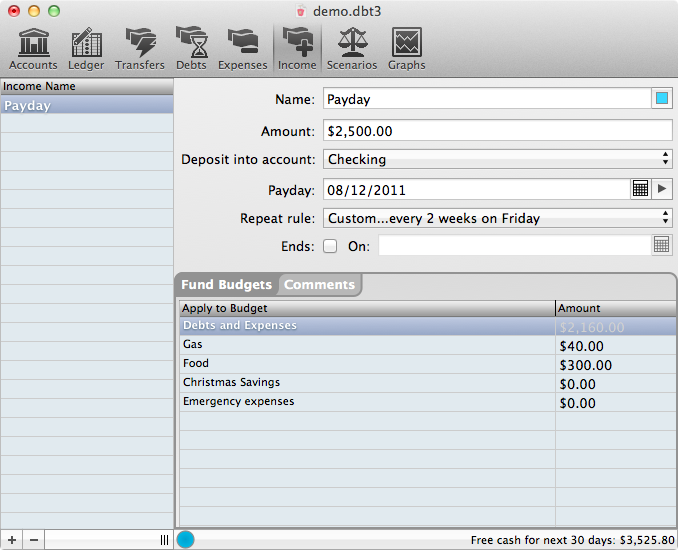
- Click on the Income Pane (third from the right on the toolbar)
- Hit the + button to add an Income event. First and foremost, you want to add in your payday. So name it "Payday".
- Next, fill in how much you get paid.
- It will default to depositing into the first bank account you have on the accounts screen. As long as you've only got one, you don't need to touch this. But if you set up multiple accounts and need to deposit into something else select it here.
- Next thing is important - put in your next payday. It defaults to today. You can either type the next date in, or hit the little calendar button at the end of the field to get a popup to select the date there. The arrow button next to the calendar advances the due date to the next payday.
- Now, set the repeat rule. This is how often it occurs. By default, it'll be set to once a month on the given date. The popup gives you a couple of common options, but if you need something more advanced, choose the last option (Custom) to get into the custom date editor. That'll allow you to do things like get paid every other Friday or the 15th and 30th of the month. Read Working with dates for more info.
- If this Income ever ends on its own (maybe you're getting seasonal Income for the next 3 months), then click off that it ends and fill in the end date.
- There's a big table here to fill in funding for various Budgets, but we're not going to worry about that right now. When you're ready to virtually segment your bank account, then go read about Working with Budgets
- For more information, see Working with Income
Step 3. Add your Expenses.
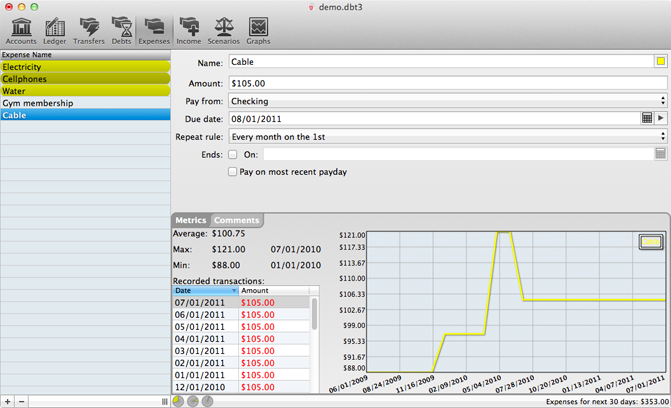
- Click on the Expenses Pane (Immediately to the left of Income on the toolbar)
- Hit the + button to add an expense event. Expenses are typically fixed dollar amount things that you have to pay to a single party. Rent, your electric bill, a gym membership, and a magazine subscription are all typical examples of Expenses.
- Keep adding in as many of those as you can think of. Don't worry if you forget one! You can always add it in later to improve accuracy.
- Next, fill in how much this is going to cost you.
- Debtinator will default to paying from the first bank account you have on the accounts screen. As long as you've only got one, you don't need to touch this. But if you set up multiple accounts and need to pay from a different one, then select it here.
- Next thing is important - put in the next date that it's due. It defaults to today. You can either type the next date in, or hit the little calendar button at the end of the field to get a popup to select the date there. The arrow button next to the calendar advances the due date to the next payday.
- Now, set the repeat rule. This is how often it occurs. By default, it'll be set to once a month on the given date. The popup gives you a couple of common options, but if you need something more advanced, choose the last option (Custom) to get into the custom date editor. That'll allow you to do things like pay a bill every 6 months or on the 15th and 30th of the month. Read working with dates for more info.
- If this expense ever ends on its own (maybe you're paying a pool membership for the next three months), then click off that it ends and fill in the end date.
- For now, we also recommend adding in a catch-all "Household Expenses" expense. Put in roughly what you think you spend during day to day life in here. Entertainment, Food, Gas, that sort of thing. Money you're going to spend, but you don't know exactly how much, when you're going to spend it, or what you're going to spend it on. Later on, you'll want to get rid of this expense and migrate to using Budgets, but don't worry about that for now.
- For more information, see Working with Expenses
Step 4 - Add your Debts.
Now you're finally at the bread and butter. Debtinator is all about getting your debts paid off, so here's where you've got to list them all.
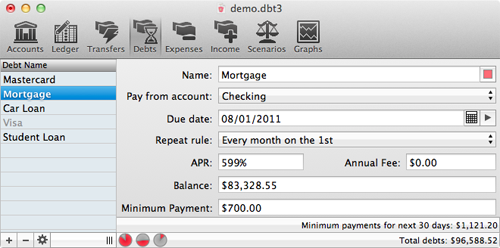
- Click on the Debts Pane (Immediately to the left of Expenses on the toolbar)
- Hit the + button to add an debt. This is anything and anyone you owe money to. Student loans, your mortgage, credit cards, car loans. They all go in here.
- Same as before, fill in the name of the debt.
- Debtinator will default to paying from the first bank account you have on the accounts screen. As long as you've only got one, you don't need to touch this. But if you set up multiple accounts and need to pay from a different one, then select it here.
- Next thing is important - put in the next date that it's due. It defaults to today. You can either type the next date in, or hit the little calendar button at the end of the field to get a popup to select the date there. The arrow button next to the calendar advances the due date to the next payday.
- Now, set the repeat rule. This is how often it occurs. By default, it'll be set to once a month on the given date. The popup gives you a couple of common options, but if you need something more advanced, choose the last option (Custom) to get into the custom date editor. That'll allow you to do things like get paid every other Friday or the 15th and 30th of the month. Read working with dates for more info.
- Next, you need to fill in the APR for this debt. How much interest is it costing you?
- If there's an annual fee (some credit cards have them), fill it in here.
- Now the big number - type in the outstanding balance on your debt. Take a deep breath, but don't worry. We're going to knock it down really fast.
- And finally, put in the minimum payment required by the bank.
- Now, after all of that, we know that your Debts may not be this simple.
Credit cards with balance transfers, variable APR mortgages, minimum payments that are a percentage of your balance and not a fixed amount: There's all sorts of weird stuff out there that we're just ignoring right now.
But, when you're comfortable, Debtinator can handle it for you. Click on the gear button in the lower left. That'll give you a popup and allow you to switch the debt to the Complex View, where you'll have far more options. But don't worry about that right now, you can get a close enough picture of things as is by filling in info that's good enough. When you're ready to fill it in exactly, go read up on Working with Debts
Step 5. Run a Scenario.
Here's where the magic happens. You've spent all of this time telling Debtinator what your living situation is like, and now it's time to help you out.
- Click on the Scenarios Pane (second one from the right on the toolbar)
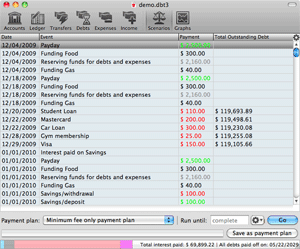
- The first scenario we want to run is the Minimum Fee Only Payment Plan. So from the Payment Plan popup on the bottom, select Minimum Fee Only Payment Plan (It's the
last one in the list). Then just hit the "Go" button. Don't worry about the other options for now. This may take a while, but we'll wait.
What it's doing now is looking out into the future to figure out just how much money you're going to spend living your life this way. This may take a while. You also may run out of money. If that happens, don't panic! It just means that you're going to need to try and reduce some of your Expenses. So try decreasing that "Household Expenses" item we told you about. And basically just play around with the numbers until the plan completes.
Once it does, you'll want to look in the lower right of the window. That'll tell you how much interest you'll end up paying and exactly when you'll be debt free. In the case of our example images there, it's $69,899.22 in interest paid, and all Debts paid off 05/22/2029.
And remember - that's not the total dollar amount you paid! That's only the interest you accrued while trying to pay back the money you originally borrowed. That is a huge chunk of change.
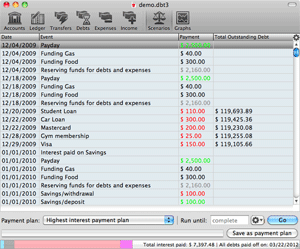
- Now let's see a better way to do it. Run another payment plan, but this time run the Highest Interest Payment Plan. What that's going to do is find any extra
money you have that you didn't allocate up above to either an expense or a debt and it's going to use that to overpay on your minimums.
This is the part where everybody starts to panic about missing out on life. This is where you worry that you're not going to get to buy pizza or go to the movies because you're sending all of your money to your Debts. But that's not how Debtinator works. You've already set aside money for pizza and movies and video games. Those are Expenses that you filled in up above (or are grouped into the Household Expenses you set up for this quickstart). So don't worry, you get to keep doing the things you want to do. Debtinator just finds the money you haven't set aside and uses that to pay things off.
So how'd you do running the Highest interest plan? In our example there, we only ended up paying $7,397.48 in interest and were debt free on 03/22/2012.
Think about that for a second - you're buying a tool here for less than $50. And it just created a payment strategy that saved our example person $62,501.74 in interest and had him living a debt free life in only 2.5 years, instead of the 20 years that the banks were planning on. Isn't that amazing?
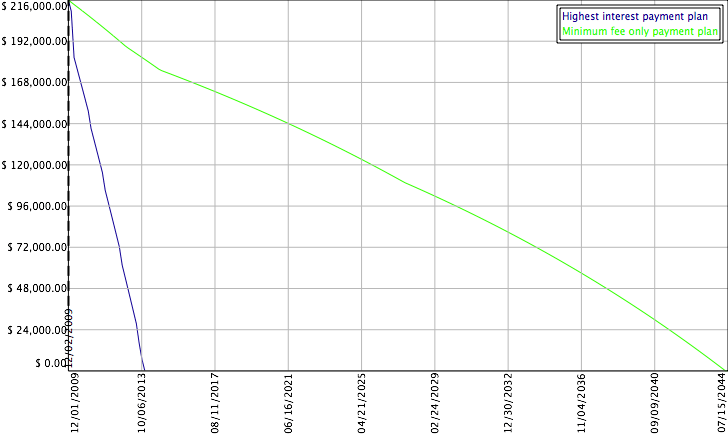
We even graphed it out there for you - The blue line is how fast your outstanding Debts drop by using the highest interest plan. The green line is how slow they move by sending only the minimum payments.
All you need to do is just follow the payment plan. Send the amount that Debtinator thinks you should on the date that it's due (ALWAYS making sure that it's an appropriate amount first, of course) and you're home free. No need to worry about scrounging up an extra $10 to send to your card, no need to figure out a plan on your own. The plan's ready made for you. You just need to follow it.
- There's a lot more to see on the Reports pane. There's a gear button in the upper right of the window - click it to get a popup of additional columns to add into the report.
In the lower right, there's another gear button. Click that one to filter which rows display. So you can see the payment strategy of how fast your credit card melts away.
If you want to see something really cool, then click on the gear button in the lower right, and choose "color code rows." That will draw a bar chart inside the table itself, and the bars will decrease as the debt balances go down.
- For more information, see Working with Scenarios
Next steps.
We've barely scratched the surface of what Debtinator can do. There's lots more to learn and much more functionality to exploit. In addition to the more detailed pages referenced above, be sure to check out these things:
- The graphs pane lets you plot out and compare payment plans. Choose the information you want to see, then hit the gear button to choose which plans to compare. If you choose "Debts Over Time" or "Interest Over Time" and only select a single payment plan, then you'll get an area graph showing you how much of your total debt is represented by each one, as well as see what gets paid off in which order. For more information, see Working with Graphs
-
The Ledger pane lets you record all of your transactions right within the application. So there's no need to use Debtinator to plan your future and another application to record
the past. You can do it all in one place.
You can segment your bank accounts into virtual Budgets. This is the famous envelope method that your grandparents probably used. Except they dealt in cash, so they could have an envelope labeled "Food" and another labeled "Bills" and another labeled "Entertainment". You probably keep all of your money in the bank and don't deal in cash. Debtinator lets you virtually segment your account, so you can have the same envelopes they did and budget appropriately, but you won't need to deal in cash all the time.
Plus, once you've found a scenario that you like, you can save it as your payment plan. Then it will show up on the Ledger and you can see exactly what's due when. if you deviate from the plan, Debtinator will warn you that you can't fulfill an expense and will encourage you to create a new plan. If you just have to have that extra pizza this month, then go ahead and write it down. It'll show you the exact ramifications, so you can make smart decisions.
Transactions can be as detailed as you want, with split records. You can even store a copy of your receipt.
Plus, there's historical reporting. So you can see where your money has been coming from and going to, and your cash flow over time. Want a report or a chart that's not already there? Then email me and tell me about it and I'll see what I can do.
For more information, see Working with Budgets and Working with Transactions
-
Play around! Life is fluid and flexible and so are your finances. You're not rigidly stuck to a single plan. Are you dying to eat out a little more each month? Put some
more money in your food budget. Then go regenerate your scenario and see what it costs you. Sure, you'll pay some more interest and be in debt a little longer, but maybe
that's worth it to you.
Are you just dying for a new computer? Set up a budget for it and save up. And then you can see the true cost of the purchase over time when you know how much longer you'll be in debt because of it. Or, see what happens when you charge it on your credit card and how much that costs. Is it better to buy now and pay more or save up and get it later? It's your choice and your decision.
There's a lot more to learn and more features to see. Go read the rest of the docs, and watch our tutorials, and ask us any questions you may have. We've tried to make this app as easy to use as possible, but above and beyond that we've tried to make it an extremely powerful tool for planning your finances. So the better you learn it and the more you can do, the more you'll know about your financial picture and the faster you can get out of debt.
Good luck! We're rooting for you!


